In my opinion flagstone patio can be one of the most beautiful and in the same time a very functional addition to your property. Backyards, patios, paths are almost blessed with this glorious blue stone slabs. Flagstone patios can boost the value of your property. They are a relatively maintenance-free and they give you a place to relax, to enjoy your family and friends.
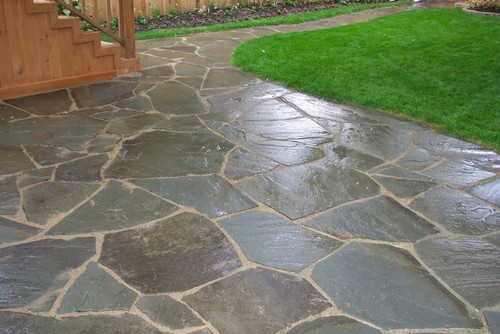
Photo by London Stoneworks LLC – Search patio pictures
Having a patio built for you is expensive, even if you can find a good professional to do it. However, if you can do it yourself and you don’t have to pay for installation the cost is much lower, and you can plan your patio project in stages if you like, adding onto it gradually as you have the time and can afford the materials.
Laying flagstone patios in sand is not difficult, although the stone can be heavy and you need protection tools such as gloves, back brace and goggles. Since the shape of this stone is irregular, laying a flagstone patio is like putting a puzzle together.
You can choose from many kinds of flagstones. There are 1- inch thick granite flagstones which are manageable because of their small size and weight. There are also flagstones 2 – inch thick. Thicker, heavier pieces would hold their positions better, but they are more expensive. The thickest, widest pieces will give you the most stability. However, since flagstone is a naturally occurring material, completely eliminating variation in thickness is not feasible, but picking your own stones from the supplier’s yard will minimize differences.
Dreamy City Backyards & Patios | OUTDOOR DECOR & LANDSCAPING IDEAS #15 (video)
Steps to take:
Getting an even surface is probably one of the most common problems with a flagstone patio. An uneven patio surface can be caused by stones of varying thicknesses, an uneven base, and settling. Of course with a good planning and preparation all three of these common problems can be avoided.
Outline the patio
- Measure before you do anything. To get started, mark the point where the patios’ surface will reach on the wall where it joins the house. Use a tape measure to determine the desired grade of the patios, than mark it on the wall with a pencil.
- Then continue making small guideline marks down the length of the wall, using a level to keep the grade consistent.
- Mark the perimeter of the patio and path using landscaper’s spray paint.
Dig out the foundation
- The first, most labor-intensive step is digging the footing for the patio. Begin by using a square-nose shovel to outline the patio perimeter.
- Loosen the soil within and scoop it out, tossing it either in buckets or a wheelbarrow so it can be easily relocated.
Create the framing for layout
- Use lengths of bender board to create the framing for the layout, flexing them so that they follow the marked curves.
- To hold the framing in place, simply insert stakes into the ground at regular intervals along the outline then nail the bender boards securely to the stakes.
Install the irrigation
- If you live in an area with a lot of rain fall, you should consider installing a drainage system before you lay down the flagstone. Settling over time may result in an evenly installed patio becoming uneven.
- It’s important also to lay in-ground access sleeves or pipes prior to installing a patio; otherwise, any electrical or water lines that need to be added later may require digging up the patio.
Spread the crushed stone
- To fill in the framing and create a solid base for the flagstone that will be laid in place next, use a filler mix of sand and crushed stone. This type of mix will create a compact, supportive base for the flagstone and will also facilitate drainage.
- Toss the gravel bags into the pit at roughly the spots you expect they’ll spread evenly. Using a utility knife, split the bags open like a fish belly and use the back side of a garden rake to start spreading an even layer throughout the pit. Pack the gravel down using a tamper.
Spread the sand
- Like the rocks, toss the bags into position before cutting them all open.
- Using the back of the garden rake spread the sand evenly over the gravel. You’ll be adding more sand in later steps, so don’t worry about adding too much on this first layer.
- Building up the sand layer in certain spots is also a good way to raise any pieces that feel too low or out of level.
Set the flagstones
- Begin laying the flagstone next to the house, working outward to fill in the area. It’s a good idea to get help for this phase because of the labor-intensive work involved.
- Position the flagstone pieces so that the best-fitting edges are next to one another, eliminating large gaps; larger pieces are laid in “heavy-traffic” areas, then surrounded with smaller pieces. It’s best to go for narrow, uniform spacing between the stones.
- As you assemble the flagstone puzzle, step back frequently to take a look at how the overall picture is emerging.
- Try to avoid sharp changes in grade from one stone to the next.
- Study each piece carefully so that the “best” sides are laid face-up. After positioning each piece, press it down firmly by hand to help it stay in place (a rubber mallet also works well for this purpose).
- Extra-small pieces are used to fill in some of the larger gaps.
- Finally, spray the entire area thoroughly with water to help settle the stones in place.
Fill in the gaps
- Pour more sand over the stones and sweep it into the gaps between them. Stone dust can also work for this step.
- Once the sand is between the stones, use a garden hose to lightly wet the whole patio, rinsing off the stones and settling the sand in place.
Conclusion
Flagstone thickness and adequate base preparation are two keys to avoiding multiple common problems with flagstone patio installation.
Flagstone is beautiful and rustic appearance makes it the perfect choice amongst homeowners who are looking to build a new patio, driveways or walkway.
Flagstone maintenance is quite simple and if installed properly flagstone patios will last for at least 50 years and will be resistant to freeze thaw conditions, hot weather conditions and rainfall.
Brick Patio Design – Beautiful and Creative Design Ideas (howtobuildahouseblog.com)


